

Replacing the stovetop grate rubber bumpers on Magic Chef RV stove
How to replace your RV stove’s rubber bumpers
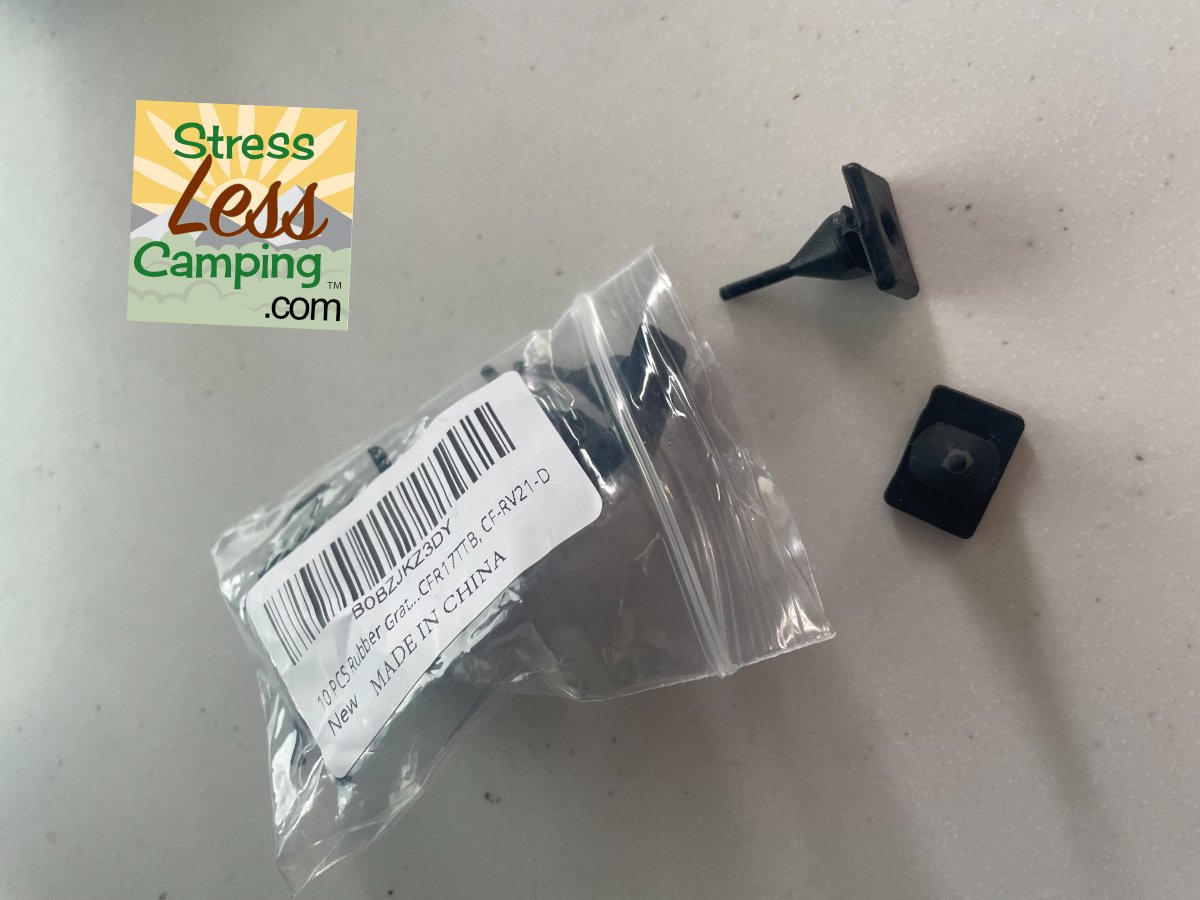
New stovetop grate rubber bumpers
A quick fix and a funny find
We all have to do the occasional minor repair to our RVs. It’s just the nature of hauling our home over bumpy roads at high speeds.
Some repairs are really fast and easy to complete. For example, we’ve had hinges that were coming loose that we just had to stick a toothpick in the hole and tighten the screw. Truthfully, we’ve done the same thing in our house so it’s not that unusual.
On occasion we enter the travel trailer after a day of driving, and find a screw or something on the floor. We try to immediately figure out where it belongs, so we can fix it right away.
Maybe you, like us, have a couple loose screws that you haven’t been able to identify. Do you, like us, have a designated spot for them in case you ever figure it out?
We keep those little mysteries in a designated corner of a kitchen drawer.

Rubber bumpers
Recently, Tony saw a post on Facebook with a link to some rubber stove grate bumpers. We discovered that there are replacement bumpers for all sorts of stovetops, and this is the set that fits our Magic Chef stovetop.
Since we have lost a few of the bumpers on our Magic Chef stovetop in the Rockwood MiniLite, we decided to give these replacement rubber bumpers a try.
The quick fix
Today I was taking a few things to the travel trailer in anticipation of our upcoming road trip. I happened to take the set of bumpers, so I decided to pop them in while it was fresh in my mind.
Rubber bumper placement into the stovetop is really easy. I removed the flat, square pieces of rubber with a hole in the center. Well, I removed all of them that I could find. There are eight holes in the stovetop for the four feet on each of two grates on our model. I only found five squares.
The new bumpers pop into the hole in the stovetop fairly easily. It’s not a loose fit, so I did have to put a bit of pressure on each one. That’s a good thing though, so they don’t just bounce out. Tip: keep pushing until you feel them really pop in there.
The set of bumpers we bought contains 10 pieces and I only needed eight. So, I decided to put the spares in the special drawer corner in case we ever need to replace one.
The funny find

The funny piece i found before is part of the bumpers
I opened the drawer and found, to my surprise, a piece of rubber we had obviously found some time ago that we weren’t able to identify. I had tossed in in the drawer and forgot about it. I realized that the piece I had found in the past, was the portion of the bumper that goes through the hole in the stovetop, to hold it in place.
I honestly thought those bumpers were just a rubber square with a hole in it, and maybe a little bit of adhesive on the back to stick it to the stovetop. I learned today that what I saved from the floor, was part of an old bumper.
Where are the rest?
Now I wonder what happened to the other seven backsides of the bumpers that I replaced today? Not to mention the other three squares? I suppose I could remove the stovetop and look for them, but that sounds like too much effort. They’ll work themselves to the floor eventually. I hope I remember what they are and throw them away instead of in the special drawer corner!

Old rubber square stovetop grate bumper


